Tuesday, September 30, 2008

Flasher Relay Part 3 Solved

I talked to Jim Westbrook today, a recent airhead expert find through craigslist about my flasher relay issue, which to date still has not been resolved. I bought a new flasher from Napa after taking the advice from the airhead archive, but no luck.

Flasher Relay

Front
Part: ATM 111953227D
Product Line: Altrom
Price : 10.79
When I starting troubleshooting, Jim asked if I had brake lights and horn, and sure enough I did not. The problem after all this troubleshooting turned out to be a bad fuse connection on the top fuse on the connection board. I sanded the contact, and replaced the fuse with a more sturdy looking one, and sure enough I got brake lights, horn and flasher back using my original OEM flasher, go figure, and the new flasher does not work, 10 bucks down the drain.

No so fast grasshopper, the issue noted in my previous post about the indicator light is still not working. With the indicator light hooked in (black.white wire on Terminal C of the flasher), the flasher starts buzzing, and I get no light. I will take a look at the circuit board, and light, because my high beam indicator light is also not working, and they are tied together at the ground side.

Good link on flasher relay substitute wiring., LINK

Sunday, September 28, 2008

Carbs, Fat, Protein

Time to take a look at the carbs. I have set the timing, valves, and new points, still running hard. New plugs coming this week, but I thought it would not hurt to take a look at the jets.

I went ahead and broke them down them Sunday night to discover some tank flakes, paste in the atomizer's, idle jet, and mixture screw area. I went ahead and used Gunk and Simple Green to clean and blow out everything I could find. The o-rings, and gaskets need to be replaced, but I figured for now, removing the gunk would at least help me continue my troubleshooting by eliminating any gunk that might effect acceleration or lurching effect during throttle.

I meet a guy from Forney, who suggested looking at the fuel lines, petcocks, since the condition seems fuel related. The next time this lurching, and stalling happens, I'm temped to quickly shutoff the fuel petcocks and remove the bowls to see if there is fuel flow issue. The fuel seems to flow fine with the bowls off at rest. The floats look original, but seem to float level.

I have removed the gas cap before thinking it was a vacumn issue, but that does not seem to help.

I will keep trying until it gets better or worse.


Notes on choke assembly from Robert Fleischer's web page (used as a reminder)
http://bmwmotorcycletech.info/bingcv.htm

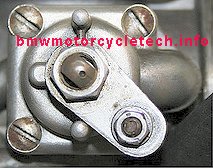
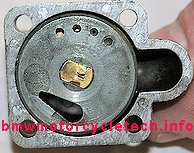
The carburetor enrichener parts orientation. The photo on the left side has a dimple on the shaft, hard to see, points to the lever barrel opening. Photo on the right has its shaft marked R, and it is from a 1978 Airhead, RIGHT side.

Three month re-cap


Well it has been three months since I bought and started working on my beemer. This recap will list of everything I bought and fixed, and what remains to be done to make my R100S road worthy for a trip outside my county.

June
  • Purchase Bike June 27th, end of month, and it sat at a mechanics waiting for parts to finish off bill of sale
  • Fixed Odometer gear slip problem
July
  • Bike at mechanics
  • Fixed Brake calipers, replaced brake fluid, bleed system
  • Drained fork oil, replaced fork seals, replaced fork oil
  • Installed front turn signals, replaced flasher relay (bad part)
  • Fixed headlight short, replaced fuses
  • Installed Bridgestone Spitfire S11, tubes, rimstrips, balanced
  • Replaced valve cover gaskets, and put helicoils in for both cover threaded bolts
  • Fixed high beam positive connection, rusty
  • Fixed running light ground wire
  • Replaced dry rotted timing inspection plug
  • Replaced stripped bolts that hold front axle on
  • Lubed front wheel axle
August
  • Bike returned from mechanic
  • Bike inspected, insured, and tagged for Texas
This is when problems started to occur
  • Flushed tank
  • Lubricated petcocks
  • Installed new screens
  • Changed oil, Castrol GTX 20W-50 (next one will use Golden Spectro 4)
  • Changed oil filter with new shim, o-ring, no paper gasket
  • Discovered left over mouse housing in Air Chamber, NO FILTER
  • Cleaned up housing
  • Up to this point, bike had not be ridden much
  • Flasher broken, removed indicator light plug for now
September

Maintenance Items
  • Final drive oil replaced
  • Choke cables lubricated
  • Installed new air filter
  • Installed new fuel taps
  • New OEM original rubber handlebar grips
  • New National Cycle Deflector Screen DX
I can summarize the later half of month as the real troubleshooting
  • Bike would stall and run real hard at speeds above 3000 RPMs, or after 10-20 mins, bike ended up dying by the side of the road
  • Replaced points, damaged wire and bad points
  • Adjusted valves
  • Adjusted timing
  • Adjusted points gap
  • Adjusted throttle stop screws for idle
  • Bike seems to be running ok, 5 min test ride
  • October will be the month where I hopefully ride more, and see if the bike is any better

Saturday, September 27, 2008

Timing is everyting


Well this weekend started my first tune up, after having so much trouble with starting and running well. All advice received so far, is timing, ignition or fuel related, so I figure it was time to go ahead and do a tune up since I do not know what the previous owner had done. Most items done to date were fixing minor issues, or replacing fluids, now I getting down and dirty and trying to make this baby purr.


On the list:

  • Adjust Valves
  • Adjust Points Gap
  • Adjust Timing

Replace plugs, later date

Bike was still running hard before these maintenance items, and I tested the bike after each procedure. Good news is after messing with the timing plate which wad frozen to the case, I got the timing correct, valves set to .10 & .20 gap, and set the points to .40 gap. The bike is running much better, it actually accelerates well, and seems fairly balanced. When I rebuild the carbs I will adjust the throttle screws per cylinder to get idle right @ 1000 rpm's, since I need to do this anyway during the rebuild.

I'm hoping my carbs are gunky which might explain the hesitations around 4000 rpm's I'm getting. It is not as bad before adjusting the timing.

Sunday, September 21, 2008

Troubleshooting Starting issue

Well, I have an engine that will not start, it cranks, but no start

Here is the condition
  • Turn ignition on
  • Set choke
  • Start cranking
  • No ignition
  • Lights work
  • Emergency switch good
  • Battery has more than 12V on meter
According to the advice given and Clymers manual Chapter 1, it could be a number of things. A good piece of advice is to start with basics, are we getting compression and spark.

I do not own a compression gauge so I started with ignition. Now I have to admit, I'm clueless to the powers of voltage, grounding. I do not know much about removing plugs, etc.

I decided to follow the advice of the book, and the forum, I removed one spark plug on the cylinder, wire and all, placed the plug down on the fins to ground this high voltage device to the "frame ground"

I switched on the key, moved the start to run, hit the start button, NO BLUE SPARK.

I repeated this for the other side, NO BLUE SPARK, problem found.

Ok, no spark, advice, guides would suggest a couple of things, bad plugs, bad coils, bad points.

Bad plugs, they looked ok, mostly brown on the right, a bit of black on the left, what are the odds of both plugs failing at the same time??

Bad coils? My bike uses two 6V Bosch coils in line together, once again what are the odds of both of these failing at once. Now the wiring schematic shows they are wired in line up stream from the condenser, it could be a bad wire between them, SINGLE POINT OF FAILURE, it could be a bad condenser. Most of the forums say that coils and condensers usually do not fail, even though this bike is 31 years old.

The next logical single point of failure is the ignition mechanism, contact breaker/points.

I pulled the battery negative lead, and inspected the points. They are badly pitted, and the black wire leading from the condenser is badly pinched where the engine cover meets a rubber grommet. As you can see in the diagram, the area that looks burnt on the sheathing was badly crimped. The pictures does not do it justice, this cable was bad, and the points were even worse. Amazing it was running at all. The black wire is flat, points sheared to one side, I think I found the issue.


I quickly went to Ted Porter's online store. (http://www.beemershop.com/catalog/) and order a set of points, and some honda moly paste for future spline and rear cup lube.

Once I get these I will try to get her back on the road, I will try to also set the timing since I have to replace the points.

Airhead Beemers Club, Craigslist and more

Building on the frustration of my last ride, my bike is now sitting in my garage. This is where the power of knowledge and other beemer heads is best utilized. I got lucky and meet a gentlemen in the Texas area trying to sell a R90. He answered my email request wondering if he did maintenance, becasue the bike he was selling described all the recent work that he had done to get it up to shape.

After talking to him and mentioned that he was working with an another gentlemen that was a avid Airhead and likes to rebuild and sell.

I also decided to reach out to Oak at askoak.com to see what my next troubleshooting steps should be for the prior lurching and now dead condition.

With a combination of adive I moved on to my next step, troubleshooting my starter issue.

Saturday, September 20, 2008

New Problem, stalling and lurching

Well, I thought everything was ok.

A new problem is starting to happen. I ride the bike, it gets warmed up, bring up to speeds around 45-60 and it starts to hesitate, lurch, and sometimes stall.

I final ride on Sep 20th during a casual Sunday resulted in final failure to crank the bike over. I pushed the beast home a mile and it is siting in my garage, will not turn over.

Back to the drawing board.

Thursday, September 18, 2008

New Grips, Ready to ride.

This was a big week, everything including my new oem rubber grips are installed, and I;m ready for a test run. I have original cables on the throttle, new air filter, most the fluids changed now, flashers working, petcocks working, choke is loose, were good to go, cross your fingers.

Sunday, September 14, 2008

Been waiting - Chicago BMW Parts


I finally got my order of parts from Chicago BMW. The forums are right, these guys are one of the less expensive parts store, but do not order from them if you are on any kinda of schedule. It took three weeks for a Air Filter, two fuel petcock nipples, and two standard rubber grips to arrive. They have good customer support, but realize that they have to order parts to be aggressive with their pricing, which means you might have to wait for the best price.

I have not been riduing the bike since I had not air filter, and working petcocks. I ordered new petcock nipples because i broke one while messing with the fuel line, and the other looked really old.

I proceeded to install the air filter, and put the petcocks back to together, she is now ready for the road.

Saturday, September 13, 2008

Choke Cables


I decided to try to free up my old choke cables today.


After removing both of them from the choke assembly, man what a pain that is, I realized the left side choke was really the one sticking badly. The internal wire near the carb conneciton is bent a couple times, and seems like it is time to replace.

Now, I do not have a fancy cable luber thingy, and these cables are old and on there way out soon, so I just needed a temporary solution. I decided that some gear oil might do the trick, and it is what I had laying around from my final drive oil replacement.

I proceeded to pour in drop by drop some oil in the cables where they would normall connect to the choke mechanism, and after "worrying" the cable back and forth the oil dripped out the bottom. This actually seem to work pretty easy with out homemade tools, just some paitence.

Now I will be replacing these cable this winter, and Ted Porter's online shop does not list them, but he said he stocks them for $10.00

Friday, September 12, 2008

Flasher Relay Part 2

My original post on this never fixed the issue, I was days away from ordering a new $60.00 dollar relay, that it occurred to me that this relay is two-in-one, and when troubleshooting original I remembered that when pulling out the flash indicator light the problem went away.

I must of not realized the errors of my way earlier. I decided to pull the indicator light connection off the flasher relay plug this time, and loose that function for now, result, no buzzing and working turn signals.

I will replace this part, because I like to know when I accidentally leave the flashers on, but for now I can deal with it.

Sunday, September 7, 2008

Final Drive Oil, Drive Shaft Oil

Replaced Final Drive Oil today, no problems, uses Hypoid Gear oil from walmart, SupoerTech, do not know much about this oil, will be using Redline for the gears.

Went to replace the drive shaft oil, and realized the top screw is stripped.

PICTURE HERE

After sending an email to AskOak@aol.com, he recommended using a custom homemade metal wedge to remove it. I might try to see of I can pull of the final drive and send it to him or Ted Porter for repair. I guess this is a common problem when over torqued.

Saturday, September 6, 2008

Newbie Mistake, Throttle Cables

Ok, I admit it, and even Ted Porter's Common Mistake website did not save me on this screw up. I need new throttle cables, so this newbie excited to see a set of 1978 R100/7 cables on ebay for $17.00 dollars, bid and won, WHOO HOO.


Problem is these cables do not work with my model, 1977 R100S. Funny thing is I ignored the advice on the wise Beemer Heads and went ahead and installed them. After wresting an hour with these new old cables, I got them installed on the throttle body, and installed them on the carbs, start it, revs to 4000 RPMS, because the cable ends near the carb are too short, thus lifting the throttle lever too high. "My Bad"

I quickly removed the new old cables, and reinstalled my original old cables, and back to normal idle, RPM's. Anybody need a set of 1977 R100/7 throttle ad speedo cables?

Installed National Cycle Deflector Screen DX

Ordered a National Cycle Deflector Screen DX from Midwest Powersports. Bot I really like how easy it was to install and adjust. I need to take some pictures so people can see it.

It does not provide all the protection of a Plexistar, but is looks much better on this model.