Sunday, December 14, 2008

Sign, sealed, delivered


Dec 14, 20008 - today with a bit of remorse, I sold my 1977 BMW R100S. I meet a beemer-head Ron who is building his collection of fine BMW airheads.

Ron had listed a very nice BMW 2000 R1100RS silver bike that I was looking at online.

We swapped bikes, and I will be helping Ron fix some minor items.

I have spent many hours, some frustrating, most satisfying working on my first airhead, the thrill of working on a 31 year old bike, instilled a bug in me I must continue, so I will be searching for the next project bike.

Friday, December 12, 2008

Engine Oil and Filter Change

Mileage on Bike
35607

It has been 6 months since I did the first oil change, I went ahead and changed the oil, oil filter, new o-ring and metal shim. The kit comes with new crush washer for the oil drain plug.

BMW Part Number
11 42 1 337 570

I have to be very careful the get the shim and the o-ring on their right, so we do not mess up the oil pressure.

Final Drive Repair

I re-installed my final drive tonight. Perry's Motorcycle repaired the filler plug on the drive shaft. A good tip Perry gave me, when reinstalling the final drive, use the axle to keep it straight when inserting back into the cup, etc. This will line up the teeth on the drift shaft correctly.

Reinstalled all plug with new crush washer, tightened everyting up.

Filled with BMW Hypoid Gear Oil

  • 100cc in the drive shaft
  • 250cc in the final drive

Sunday, December 7, 2008

Rust-eze


Removed rust from under and backside of mufflers on left and right, pretty straight forward cosmetic work.

Cheap Plug for a vendor

I utilized Rust-eze Medication Bumper Ointment, proud sponsor of Lighting McQueen in Disney/Pixar movie Cars.

"Man with rusteze, I was able to get all the crud, rust, muck, and grime off my bumper, now my wife says my bumper is looking oh so fine."

Before.........................After


Sunday, November 2, 2008

$4 carb sync tool

This article should be printed out for any airhead, VTwin mechanic

http://www.airheads.org/content/view/183/98/

I have tried the carb sync method of shorting out each cylinder, but I'm not experienced enough to detect the sound differences, so I thought I would try this method. Now the online forums recognize this technique, but argue that it is less effective given it is only measuring vacuum differences. I thought I would give is a shot, and for $4 buck it can not hurt at this point to get the vacuum right.

I built my tool from parts from Lowes, 3.87 in tubing, and a yard stick. I used motor oil, because that is what I had sitting around.

PICTURE OF TOOL HERE

I built the tool ,and hung it from the garage door railings over night to let the oil settle to the the bottom on the tubing. The next day went for a 30 min ride, and came back in synced the carbs at idle, using the idle screw stop.

I will need to sync the carbs with the new throttle cables, but I need a second set of hands which are not here right now.

Saturday, November 1, 2008

October Recap, Future Work

  • Trans Fluid
  • New Spark Plugs
  • New Choke, Throttle Cables
  • New Brake Pads
  • New Brake Fluid
  • New Carb Kits
  • New Brake Kits
November (no more Riding predicted)
  • Sync Carbs
  • Get some final riding in
Dec-Feb (Winter Projects, Storage)
  • Stabilize Fuel
  • Trickle Charger every two weeks for battery
  • Final Drive stripped screw, fix with helicoil
  • Lube transmission/clutch spline with back end off
  • Top end, new rubber pushrod seals, inspect top end
  • Start on cosmetics, start with simple rust on mufflers
  • Oil change over winter, remove oil pan inspect oil pump and strainer

Friday, October 31, 2008

New brake fuild, wrapping up


Well , it is the end of October, I put the carbs, and brakes, and front wheel all back together now.

I added brake fluid, DOT 3, which is recommended by Clymer and the forums. I bleed the brakes, and it feels pretty good, no bubbles in the line. I will test ride, and bleed a little more if necessary. I put the tank back on and took it for a test ride.

The carbs need adjusting quickly, since putting all new cables, etc on. This is my next procedure, build a carb stick and balance them until she purrs.

Thursday, October 30, 2008

Rebuild Front Wheel Bearings

I'm very proud of this next maintenance items, not because it was hard to do, but it is the first procedure where I actually made my own tool to perform the work. After reading the posts online, the front wheel bearing cap on my R100S has four small holes in the cap that requires a tool to be inserted into to it to unscrew the polished cap. The posts warn about not using a screw drive or nail to perform this task of screwing the cap, the cap is fairly large so it needs to be done right.

Following the Airhead canyons of do it cheap, I cut a 1x1 strip of scrap wood about two feet long, enough to get some leverage., I then measure the holes on the cap and drilled some small holes in the center of the wood that aligned with the cap. I took some small sheet metal bolts and inserted them into two of the holes so they were protruding out from the wood, but enough grab in the wood not to move.

I inserted the tool into the cap, and leftty loosey waa laa, she unscrewed with a bit of torque. I would love to work on machines all day if it paid what the IT industry would.

I cleaned up the bearings, the grease had gone pretty brown, cleaned the bearings out with Gunk cleaner, than simple green, a good rinse, and blew them out with air. I proceeded to lube with Moly past, pout all the spacers back together, and man did the front wheel glide. After I put them wheel back on I could not believe the free play in the wheel. I have left the brake calipers loose since the rebuild until this part was completed.

INSERT PICTURE OF TOOL HERE

Friday, October 24, 2008

New Front brakes

I ordered new caliper kits for the dual front disc brakes, these are dust covers, and seals, and new pads, Freedo brake pads from the BeemerShop to be exact

While I had the front wheel off I decided to inspect the front wheel bearings and relube using the proper grease.

I drained all the brake fluid, and got to work on the front end.

The brake caliper pistons and the inside were very clean, very little work, no scratches on the pistons, and the internal groove of each piston was remarkably clean.

From the Beemershop

"When BMW switched from the original non-metallic Jurid pad to the semi-metallic Textar pad, there was a noticeable improvement in braking power. Those pads are still available from BMW, but they are very expensive. Ferodo Platinum Series pads are constructed similar to the BMW Textar pad at a fraction of the cost. Fits all 74-80 models EXCEPT R65. The only semi-metallic aftermarket brake pads available for the /6/7 series. Provides longer life and better stopping power with a slight increase in rotor wear. Recommend new o-ring and clip which are not included, but we have them in stock."

Sunday, October 19, 2008

New Throttle Cables

Since I just re-did the carbs, and choke cables, before I put them back on the bike I installed new throttle cables.

At this point, I have replaced all the cables minus the new brake cable I ordered.

New carb kit, choke, and throttle cables.

I'm in the process of making a carb sync tool, since everything will have to be synced given all these new parts.

Friday, October 17, 2008

New Carb Rebuild

Time to rebuild the carbs today, my carb rebuild came in the mail

  • New Diaphrams
  • New Gaskets
  • New O-rings
I did noticed that the left carb ran much smoother, I did one at a time, between test rides.

Here is the kit visually

Thursday, October 16, 2008

New Clutch Cable

I installed a new clutch cable today, boy what a difference the new bowden cable made, I adjusted to the proper feel, with no slippage, it made such a difference in shifting from first to second.

Monday, October 6, 2008

New Plugs Bosch W5DC Copper Core


I installed new spark plugs today, man bike started right up, first try with choke. The old NGK plugs did not look that bad, and I will save for emergency road trip parts, but at least I know they are new, and original Bosch plugs to boot.

Sunday, October 5, 2008

Bing Carb Numbers


In preparing to order Bing rebuild kits, I came across conflicting information about my 1977 R100S. Some of the third party online parts suppliers have my carbs listed as 32mm carbs, others listed as 40mm carbs.

The Beemershop showed me where the numbers are, man they are hard to read. On mine they are located on the left webbing area right below the cover, they are stamped vertically, and mine were not stamped deep. The "/" slahes alomst look like 1's if your aware this is the format X/Y/Z.

Mine are 40mm carbs, like I thought, but it is worth checking, measure twice, buy once.


Left Carb
94/40/103

Right Carb
94/40/104

Reference:

Bing Link

Friday, October 3, 2008

Good Vibrations

Real Progress

A short 40 mins test ride, no stumbling, no lurching, no stalling, very slight popping on engine braking, but not load or consistent. I might have somewhat corrected the fuel issue. On the next ride, I will pull over at random times, and check fuel level in bowls just to see if the absense of screens is realing making a difference.

Next problem, is why the low vibration at all speeds. Idle is rough, Plug replacement, and check gap spacing is next test, of course one at a time to see if the new plugs will help.

Tranny Drink

Continuing my maintenance list, I had order some Redline Transmission fluid, not a difficult task, not necessary given the unknown maintenance this bike had.

While draining the old gear oil, I realized I forgot to get a new crush washer for the drain plug. I have a new filler plug crush washer, hopefully it will not leak much.

One quart of Redline 75W90 synthetic oil, and about 10 mins later were good to go.

Note
Old oil did not look bad at all. Magnet drain plug had a bit of black paste, and some small flakes.

Thursday, October 2, 2008

Fuel Petcock Screens

Since my stumbling, lurching issue started, I want to test if this was a fuel flow issue.

The Test Ride
I went for a short ride, various speed, after about 10 mins, the bike lurched, and begin its usual crappy ride. I pulled over, gave it about 2 mins for carbs to fill back up and continued on. I rode another 10 mins, and the bike still was lurching, this time I had only one petcock on, the left, I quickly reached down turned it off, and pulled over.

The left carb bowl was about 1/3 full, and the right about half. I left the petcocks on, and it would not start, until I let the bowls fill back up. At this point the carbs are not synced, so it might be running lean or rich, but it did seem as though my issue is fuel flow.

Fuel gas cap is venting, so I decided to check the new petcock screens. I proceeded to let the bike cool off, and then drain the fuel, the left side seemed slower than the right as the fuel flowed out of the petcocks. I cleaned them out,, there was some red flakes coming out of the petcock tops, and reinstalled minus the small lower screens. I left the top straw screen on, since i know the tank is flaking a bit.


This tank is due for flush out, repair, and paint, but for now I will try riding without lower screens to see if this helps.

Tuesday, September 30, 2008

Flasher Relay Part 3 Solved

I talked to Jim Westbrook today, a recent airhead expert find through craigslist about my flasher relay issue, which to date still has not been resolved. I bought a new flasher from Napa after taking the advice from the airhead archive, but no luck.

Flasher Relay

Front
Part: ATM 111953227D
Product Line: Altrom
Price : 10.79
When I starting troubleshooting, Jim asked if I had brake lights and horn, and sure enough I did not. The problem after all this troubleshooting turned out to be a bad fuse connection on the top fuse on the connection board. I sanded the contact, and replaced the fuse with a more sturdy looking one, and sure enough I got brake lights, horn and flasher back using my original OEM flasher, go figure, and the new flasher does not work, 10 bucks down the drain.

No so fast grasshopper, the issue noted in my previous post about the indicator light is still not working. With the indicator light hooked in (black.white wire on Terminal C of the flasher), the flasher starts buzzing, and I get no light. I will take a look at the circuit board, and light, because my high beam indicator light is also not working, and they are tied together at the ground side.

Good link on flasher relay substitute wiring., LINK

Sunday, September 28, 2008

Carbs, Fat, Protein

Time to take a look at the carbs. I have set the timing, valves, and new points, still running hard. New plugs coming this week, but I thought it would not hurt to take a look at the jets.

I went ahead and broke them down them Sunday night to discover some tank flakes, paste in the atomizer's, idle jet, and mixture screw area. I went ahead and used Gunk and Simple Green to clean and blow out everything I could find. The o-rings, and gaskets need to be replaced, but I figured for now, removing the gunk would at least help me continue my troubleshooting by eliminating any gunk that might effect acceleration or lurching effect during throttle.

I meet a guy from Forney, who suggested looking at the fuel lines, petcocks, since the condition seems fuel related. The next time this lurching, and stalling happens, I'm temped to quickly shutoff the fuel petcocks and remove the bowls to see if there is fuel flow issue. The fuel seems to flow fine with the bowls off at rest. The floats look original, but seem to float level.

I have removed the gas cap before thinking it was a vacumn issue, but that does not seem to help.

I will keep trying until it gets better or worse.


Notes on choke assembly from Robert Fleischer's web page (used as a reminder)
http://bmwmotorcycletech.info/bingcv.htm

The carburetor enrichener parts orientation. The photo on the left side has a dimple on the shaft, hard to see, points to the lever barrel opening. Photo on the right has its shaft marked R, and it is from a 1978 Airhead, RIGHT side.

Three month re-cap


Well it has been three months since I bought and started working on my beemer. This recap will list of everything I bought and fixed, and what remains to be done to make my R100S road worthy for a trip outside my county.

June
  • Purchase Bike June 27th, end of month, and it sat at a mechanics waiting for parts to finish off bill of sale
  • Fixed Odometer gear slip problem
July
  • Bike at mechanics
  • Fixed Brake calipers, replaced brake fluid, bleed system
  • Drained fork oil, replaced fork seals, replaced fork oil
  • Installed front turn signals, replaced flasher relay (bad part)
  • Fixed headlight short, replaced fuses
  • Installed Bridgestone Spitfire S11, tubes, rimstrips, balanced
  • Replaced valve cover gaskets, and put helicoils in for both cover threaded bolts
  • Fixed high beam positive connection, rusty
  • Fixed running light ground wire
  • Replaced dry rotted timing inspection plug
  • Replaced stripped bolts that hold front axle on
  • Lubed front wheel axle
August
  • Bike returned from mechanic
  • Bike inspected, insured, and tagged for Texas
This is when problems started to occur
  • Flushed tank
  • Lubricated petcocks
  • Installed new screens
  • Changed oil, Castrol GTX 20W-50 (next one will use Golden Spectro 4)
  • Changed oil filter with new shim, o-ring, no paper gasket
  • Discovered left over mouse housing in Air Chamber, NO FILTER
  • Cleaned up housing
  • Up to this point, bike had not be ridden much
  • Flasher broken, removed indicator light plug for now
September

Maintenance Items
  • Final drive oil replaced
  • Choke cables lubricated
  • Installed new air filter
  • Installed new fuel taps
  • New OEM original rubber handlebar grips
  • New National Cycle Deflector Screen DX
I can summarize the later half of month as the real troubleshooting
  • Bike would stall and run real hard at speeds above 3000 RPMs, or after 10-20 mins, bike ended up dying by the side of the road
  • Replaced points, damaged wire and bad points
  • Adjusted valves
  • Adjusted timing
  • Adjusted points gap
  • Adjusted throttle stop screws for idle
  • Bike seems to be running ok, 5 min test ride
  • October will be the month where I hopefully ride more, and see if the bike is any better

Saturday, September 27, 2008

Timing is everyting


Well this weekend started my first tune up, after having so much trouble with starting and running well. All advice received so far, is timing, ignition or fuel related, so I figure it was time to go ahead and do a tune up since I do not know what the previous owner had done. Most items done to date were fixing minor issues, or replacing fluids, now I getting down and dirty and trying to make this baby purr.


On the list:

  • Adjust Valves
  • Adjust Points Gap
  • Adjust Timing

Replace plugs, later date

Bike was still running hard before these maintenance items, and I tested the bike after each procedure. Good news is after messing with the timing plate which wad frozen to the case, I got the timing correct, valves set to .10 & .20 gap, and set the points to .40 gap. The bike is running much better, it actually accelerates well, and seems fairly balanced. When I rebuild the carbs I will adjust the throttle screws per cylinder to get idle right @ 1000 rpm's, since I need to do this anyway during the rebuild.

I'm hoping my carbs are gunky which might explain the hesitations around 4000 rpm's I'm getting. It is not as bad before adjusting the timing.

Sunday, September 21, 2008

Troubleshooting Starting issue

Well, I have an engine that will not start, it cranks, but no start

Here is the condition
  • Turn ignition on
  • Set choke
  • Start cranking
  • No ignition
  • Lights work
  • Emergency switch good
  • Battery has more than 12V on meter
According to the advice given and Clymers manual Chapter 1, it could be a number of things. A good piece of advice is to start with basics, are we getting compression and spark.

I do not own a compression gauge so I started with ignition. Now I have to admit, I'm clueless to the powers of voltage, grounding. I do not know much about removing plugs, etc.

I decided to follow the advice of the book, and the forum, I removed one spark plug on the cylinder, wire and all, placed the plug down on the fins to ground this high voltage device to the "frame ground"

I switched on the key, moved the start to run, hit the start button, NO BLUE SPARK.

I repeated this for the other side, NO BLUE SPARK, problem found.

Ok, no spark, advice, guides would suggest a couple of things, bad plugs, bad coils, bad points.

Bad plugs, they looked ok, mostly brown on the right, a bit of black on the left, what are the odds of both plugs failing at the same time??

Bad coils? My bike uses two 6V Bosch coils in line together, once again what are the odds of both of these failing at once. Now the wiring schematic shows they are wired in line up stream from the condenser, it could be a bad wire between them, SINGLE POINT OF FAILURE, it could be a bad condenser. Most of the forums say that coils and condensers usually do not fail, even though this bike is 31 years old.

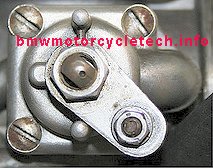
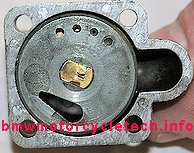
The next logical single point of failure is the ignition mechanism, contact breaker/points.

I pulled the battery negative lead, and inspected the points. They are badly pitted, and the black wire leading from the condenser is badly pinched where the engine cover meets a rubber grommet. As you can see in the diagram, the area that looks burnt on the sheathing was badly crimped. The pictures does not do it justice, this cable was bad, and the points were even worse. Amazing it was running at all. The black wire is flat, points sheared to one side, I think I found the issue.


I quickly went to Ted Porter's online store. (http://www.beemershop.com/catalog/) and order a set of points, and some honda moly paste for future spline and rear cup lube.

Once I get these I will try to get her back on the road, I will try to also set the timing since I have to replace the points.

Airhead Beemers Club, Craigslist and more

Building on the frustration of my last ride, my bike is now sitting in my garage. This is where the power of knowledge and other beemer heads is best utilized. I got lucky and meet a gentlemen in the Texas area trying to sell a R90. He answered my email request wondering if he did maintenance, becasue the bike he was selling described all the recent work that he had done to get it up to shape.

After talking to him and mentioned that he was working with an another gentlemen that was a avid Airhead and likes to rebuild and sell.

I also decided to reach out to Oak at askoak.com to see what my next troubleshooting steps should be for the prior lurching and now dead condition.

With a combination of adive I moved on to my next step, troubleshooting my starter issue.

Saturday, September 20, 2008

New Problem, stalling and lurching

Well, I thought everything was ok.

A new problem is starting to happen. I ride the bike, it gets warmed up, bring up to speeds around 45-60 and it starts to hesitate, lurch, and sometimes stall.

I final ride on Sep 20th during a casual Sunday resulted in final failure to crank the bike over. I pushed the beast home a mile and it is siting in my garage, will not turn over.

Back to the drawing board.

Thursday, September 18, 2008

New Grips, Ready to ride.

This was a big week, everything including my new oem rubber grips are installed, and I;m ready for a test run. I have original cables on the throttle, new air filter, most the fluids changed now, flashers working, petcocks working, choke is loose, were good to go, cross your fingers.

Sunday, September 14, 2008

Been waiting - Chicago BMW Parts


I finally got my order of parts from Chicago BMW. The forums are right, these guys are one of the less expensive parts store, but do not order from them if you are on any kinda of schedule. It took three weeks for a Air Filter, two fuel petcock nipples, and two standard rubber grips to arrive. They have good customer support, but realize that they have to order parts to be aggressive with their pricing, which means you might have to wait for the best price.

I have not been riduing the bike since I had not air filter, and working petcocks. I ordered new petcock nipples because i broke one while messing with the fuel line, and the other looked really old.

I proceeded to install the air filter, and put the petcocks back to together, she is now ready for the road.

Saturday, September 13, 2008

Choke Cables


I decided to try to free up my old choke cables today.


After removing both of them from the choke assembly, man what a pain that is, I realized the left side choke was really the one sticking badly. The internal wire near the carb conneciton is bent a couple times, and seems like it is time to replace.

Now, I do not have a fancy cable luber thingy, and these cables are old and on there way out soon, so I just needed a temporary solution. I decided that some gear oil might do the trick, and it is what I had laying around from my final drive oil replacement.

I proceeded to pour in drop by drop some oil in the cables where they would normall connect to the choke mechanism, and after "worrying" the cable back and forth the oil dripped out the bottom. This actually seem to work pretty easy with out homemade tools, just some paitence.

Now I will be replacing these cable this winter, and Ted Porter's online shop does not list them, but he said he stocks them for $10.00

Friday, September 12, 2008

Flasher Relay Part 2

My original post on this never fixed the issue, I was days away from ordering a new $60.00 dollar relay, that it occurred to me that this relay is two-in-one, and when troubleshooting original I remembered that when pulling out the flash indicator light the problem went away.

I must of not realized the errors of my way earlier. I decided to pull the indicator light connection off the flasher relay plug this time, and loose that function for now, result, no buzzing and working turn signals.

I will replace this part, because I like to know when I accidentally leave the flashers on, but for now I can deal with it.

Sunday, September 7, 2008

Final Drive Oil, Drive Shaft Oil

Replaced Final Drive Oil today, no problems, uses Hypoid Gear oil from walmart, SupoerTech, do not know much about this oil, will be using Redline for the gears.

Went to replace the drive shaft oil, and realized the top screw is stripped.

PICTURE HERE

After sending an email to AskOak@aol.com, he recommended using a custom homemade metal wedge to remove it. I might try to see of I can pull of the final drive and send it to him or Ted Porter for repair. I guess this is a common problem when over torqued.

Saturday, September 6, 2008

Newbie Mistake, Throttle Cables

Ok, I admit it, and even Ted Porter's Common Mistake website did not save me on this screw up. I need new throttle cables, so this newbie excited to see a set of 1978 R100/7 cables on ebay for $17.00 dollars, bid and won, WHOO HOO.


Problem is these cables do not work with my model, 1977 R100S. Funny thing is I ignored the advice on the wise Beemer Heads and went ahead and installed them. After wresting an hour with these new old cables, I got them installed on the throttle body, and installed them on the carbs, start it, revs to 4000 RPMS, because the cable ends near the carb are too short, thus lifting the throttle lever too high. "My Bad"

I quickly removed the new old cables, and reinstalled my original old cables, and back to normal idle, RPM's. Anybody need a set of 1977 R100/7 throttle ad speedo cables?

Installed National Cycle Deflector Screen DX

Ordered a National Cycle Deflector Screen DX from Midwest Powersports. Bot I really like how easy it was to install and adjust. I need to take some pictures so people can see it.

It does not provide all the protection of a Plexistar, but is looks much better on this model.

Thursday, August 28, 2008

My first Oil change

Today was my first oil change since getting the bike back from the mechanic.  He did put 2.5 liters of fresh oil in when replacing the oil pan gasket, but used Castrol GTX 20W-50, and I want to switch it to Spectro Golden 4.  I will also be inspecting the oil filter, o-ring situation.

After draining all the oil, I re-installed the oil plug and decided to focus on the filter.  I will not be removing the oil pan, screen, etc since the oil pan gasket is brand new, and I do not have that ordered yet.  After the air filter nightmare, I will be doing a full oil strip down this winter.

My 77 R100 uses the recessed oil cover, 
can accept the hinged oil filter, and I will be using the advice on Anton measuring the depth of the canister, and deciding whether to use Shim and paper cover gasket.  GREAT ARTICLE HERE, http://largiader.com/tech/filters/canister.html

Removal of Old Filter
When removing the oil cover, there was a paper gasket installed.  When I removed the oil filter, the previous owner used a BMW purolator long filter, non-hinged.  The metal shim was installed against the face of the cover, and the o-ring which was red, was snug up against the canister edge.  My version has the older sharper edge canister, and the o-ring was marred with marks of the canister edge.  He basically installed it backwards.

New Installation
I installed the hinged filter, 
metal shim, white $2000 o-ring, and then cover, leaving off the paper gasket.  I do not own a caliper, and could not measure the canister depth, but after reading Snowbum's article,which sows it is rarely used, and most likely would always be better off without it, I left it off for now.  I will keep my eye on leaks, etc.

Sunday, August 24, 2008

There's a mouse in my house

WOW, today while continuing my basic maintenance routine, I decided to inspect the air filter to see if what the buyer sold me was cruddy and old.  I removed the left side cover, choke cable cable and all, and was shocked to see no air filter.  I immediately thought of ruined carbs, and stories of overhauls.  I did this at night in my garage and the shadows of the garage lights initially hide the fact that something else was in there beside an air filter.

I discovered to my amazement, remnants of a Little critter that had once bunked down and made himself/herself at home in the cozy voice space between the left and right carbs intakes.
I quickly removed the carb tubes, tapped up my Bings and went to work on cleaning out the nut shells, small bits of twine, and other appealing droppings left behind.  Since most of the debris was below the intake holes, I'm hoping not too much ever made it into the carbs.

Guess what rebuild I will be doring this winter, Bing.com

Saturday, August 23, 2008

Flasher Relay


Today, a small buzzing was coming out of my headlight bucket.  After removing the housing, a the small black box on the left was buzzing while the key was in the run position.  This was the flasher relay device.  After removing the box, the buzzing does stop and does not translate its problem downstream anywhere I could tell, but then I loose the flasher function.  The flashers do work while the buzzing is happening, but it is something I want to fix.

After reading the airheads archive list and posting an email, I get different opinions on what the problem is and how to fix.

Some suggest it is a bad relay, some suggest it is bad grounding, and some suggest it was a bad fuse.  Currently I have removed the flasher, and will proceed with buying a alternate car flasher, which will suffice minus the indicator light on the odometer.  For you headz who have the same problem I will post my fix.  I have been told to check out a VW replacement, or pick up one at autozone.  Here is a diagram of the flasher for wiring reference.

The airheads club does have a good article on this topic under this link, http://www.airheads.org/content/view/159/49/.

Here is the VW part I'm thinking of trying, recommended by a few headz.


Thursday, July 17, 2008

New Rubbers

Since the mechanic had my bike in the shop and the original tires were cracked and dry rotted, I decided to heed the advice of the Airhead Archive list and try out the Bridegstone Spitfire S11 tires.

I also listened to the whole thread on whether to use tubes or not.  I decided to go with new tubes, rim strips, and new tires.  I went online to American Tire and ordered the following for the bike.

1 x BRIDGESTONE S11 100/90H-19 BW FRONT (B1150) = $51.01 
1 x BRIDGESTONE S11 110/90H-18 BW REAR (B2140) = $53.36 
Sub-Total: $104.37 GROUND SHIPPING 
(Code 2000  Texas, United States  ): $16.79 
Total: $121.16

These tires will hopefully last 10K miles.


Monday, July 14, 2008

Some major items

In mid July, the guy I bought the bike from had his mechanic finish some items that needed looking after from the Bill of Sale.  This wrencher loved to work on bikes, and seem to have some good knowledge of beemers.

He drained the brake and fork oil, replaced some seals, rebuilt one of the brake calipers, replaced the valve cover and oil pan gaskets.  He also installed the grab bar and brand new turn signals on the front.

One thing to note is on the 1977 BMW R100S, the front turn signal brackets are chrome plated metal, gut a later R100CS model uses black metal brackets which are much cheaper.  Rusty at MAX BMW turned me onto this and I had the mechanic install those instead.

Saturday, July 12, 2008

Napa inline fuel filters


After noticing that my petcocks had no internal screens in them (I will replace these when I service the petcocks), I decided to go with the inline Napa Fuel Filters (paper ones).  These are cheap and can be purchased also in bulk at some marine supply stores.

Here is the Napa link for future reference, Part Number 702323.


These fuel filters are easy to install, but I did remove the cross over line between the original fuel T joints to make these fit.  I have the older Fuel Petcock Style #2, the the output nipple sticking straight down, not to the left or right on later bikes.


Tuesday, July 1, 2008

Lets get Wrenching


Ok, my first maintenance item.  I found a very useful post on how to fix a slipped gear within the airhead boxer odometers.  


This link (http://www.airheads.org/content/view/160/98/)  is awesome, has pictures, and a very well laid out description on how to fix the slipped gear preventing the odometer to advance.

I carefully removed the odometer, the tac cable was a bear to remove, laid out everything on the dinning room table and dismantled this baby until I could see that the gear was indeed slipping.  I proceeded to use JB weld to fix the gear as instructed, and everything went as planned.  Fixed odometer.

Got to love free resources.

Saturday, June 28, 2008

Lets get started


The moment I got home I went on to eBay and purchased a Clymer manual.  While doing my research of the bikes, I came across BMW websites that suggested getting this bible right away.  I ordered the book for a total of $42.17, and decided I would not do any work until it arrived, (Yeah Right).  

I took the bike out today for a short test ride, and the first thing I noticed wrong besides what was told to me during the test ride, is the odometer was not advancing as I rode it around the neighborhood.

What GIVES???

Today I also decided that I would keep a spreadsheet of all maintenance and parts order to show a running total if I ever needed to sell it.

I also decided to use delicious bookmarks to store all my favorite online resources which is a very long list up to this point.

My first beemer


June 28, 2008

I was very excited today to be purchasing my first BMW motorcycle from a gentlmen in Dallas. He is a hobbiest who would buy old motorcycles, wax them up, change oil, and turn them for profit. He was busy running a furniture warehouse business, so he decided to get out of the turning motorcycle business for a bit.

I found this 1977 BMW R100S boxer through dallas craigslist with 35263 miles. I was debating going with a 1975 R90/7 which was black and in good condition also, but this one looked a bit newer even though I knew it needed some work to get road worthy.

The bill of sale included some misc items, grab bar, turn signals, and a left side head gasket which was leaking a bit on the floor.

I ended up hauling the bike home, and taking pictures right away. Little did I know the slight mess ahead of me.